

Everything you need to know about Enegic: The installer's guide
January 3, 2024
Are you an installer constantly seeking the latest and most efficient for your clients? Then "Everything You Need to Know About Enegic" is your new bible! We're going to dive deep into the world of Enegic, a leading player in dynamic load balancing for electric vehicle chargers. Sit back and let's explore this technical marvel together!
Understanding Enegic: What Is It and Why Is It Important?
Enegic is not just a load balancer; it's a central part of the modern, smart home. This system ensures efficient and safe charging of electric cars by balancing the load and maximizing the use of available power without overloading the main fuse.
What are Enegic Monitor, Enegic One, and Enegic EVI?
Enegic Monitor
Enegic Monitor is a dynamic load balancer that reads power and energy consumption in real-time per phase, allowing monitoring and power control of electrical consumers like charging boxes.
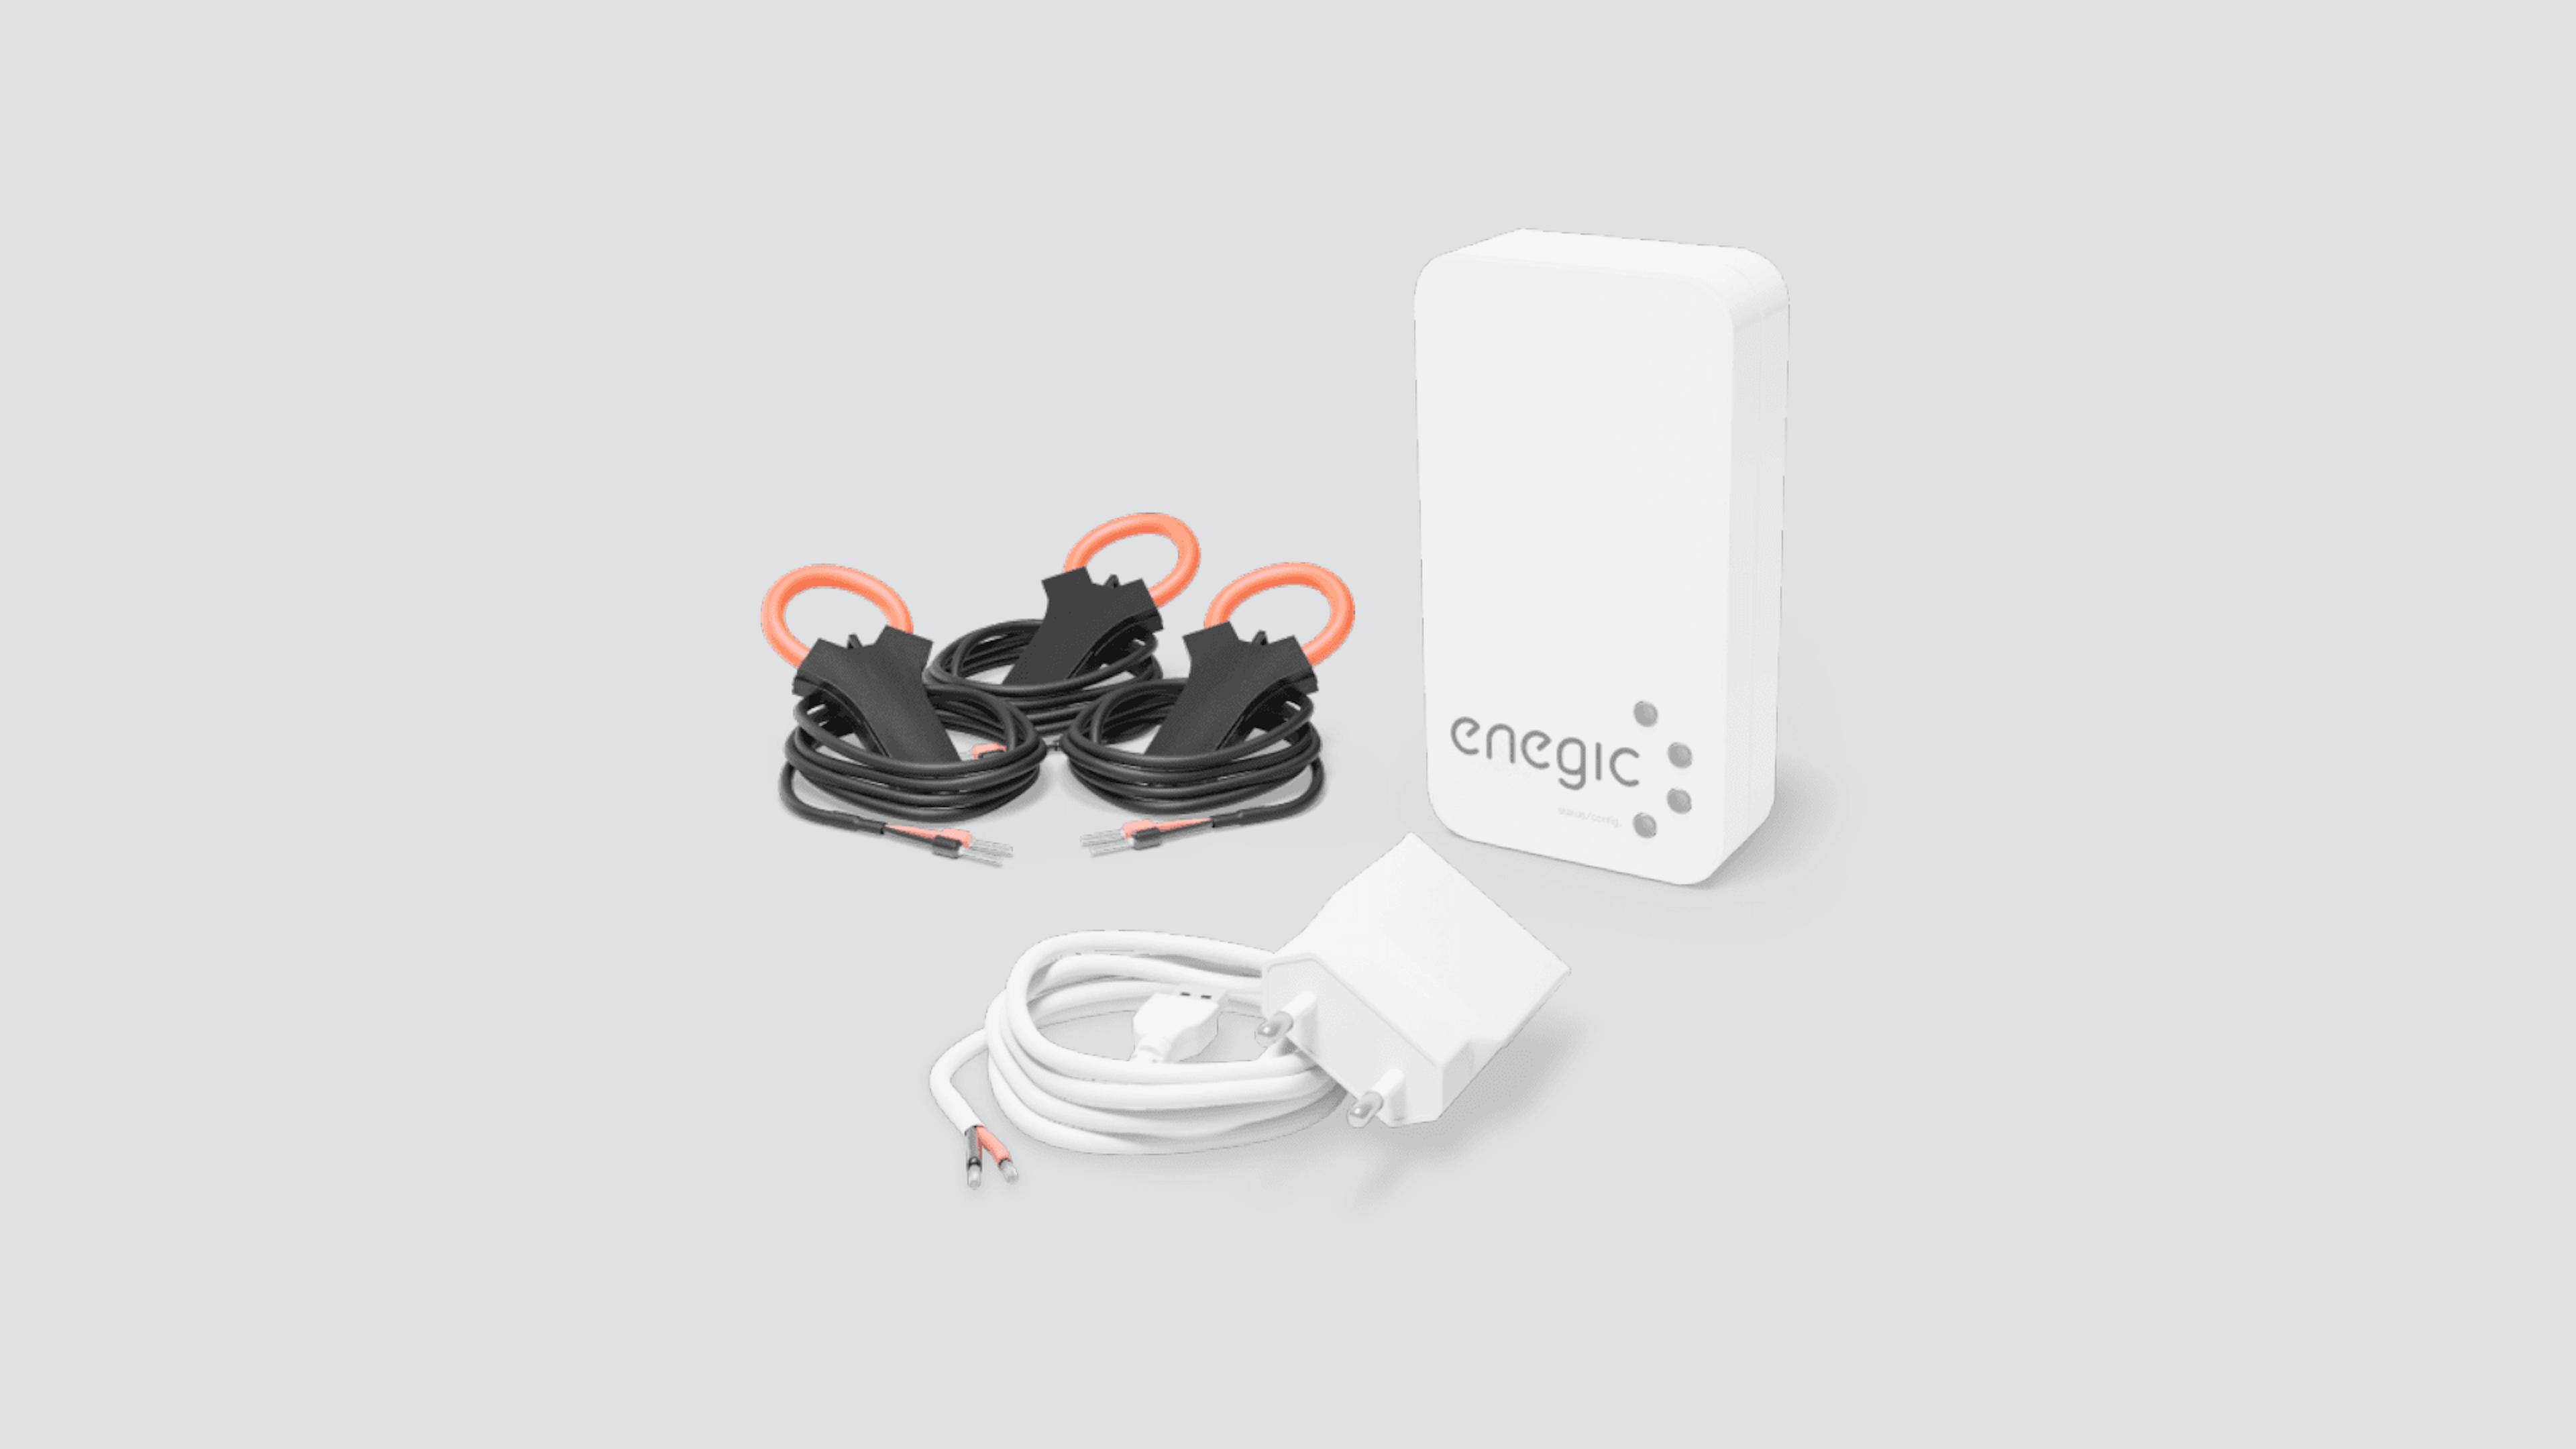
The unit fits in all properties regardless of new or old electricity meters and is directly connected to the property's phases via current sensors (included 16mm or 36mm) and is powered either via the included USB charger or optionally via power adapter DIN with terminal cord purchased separately.
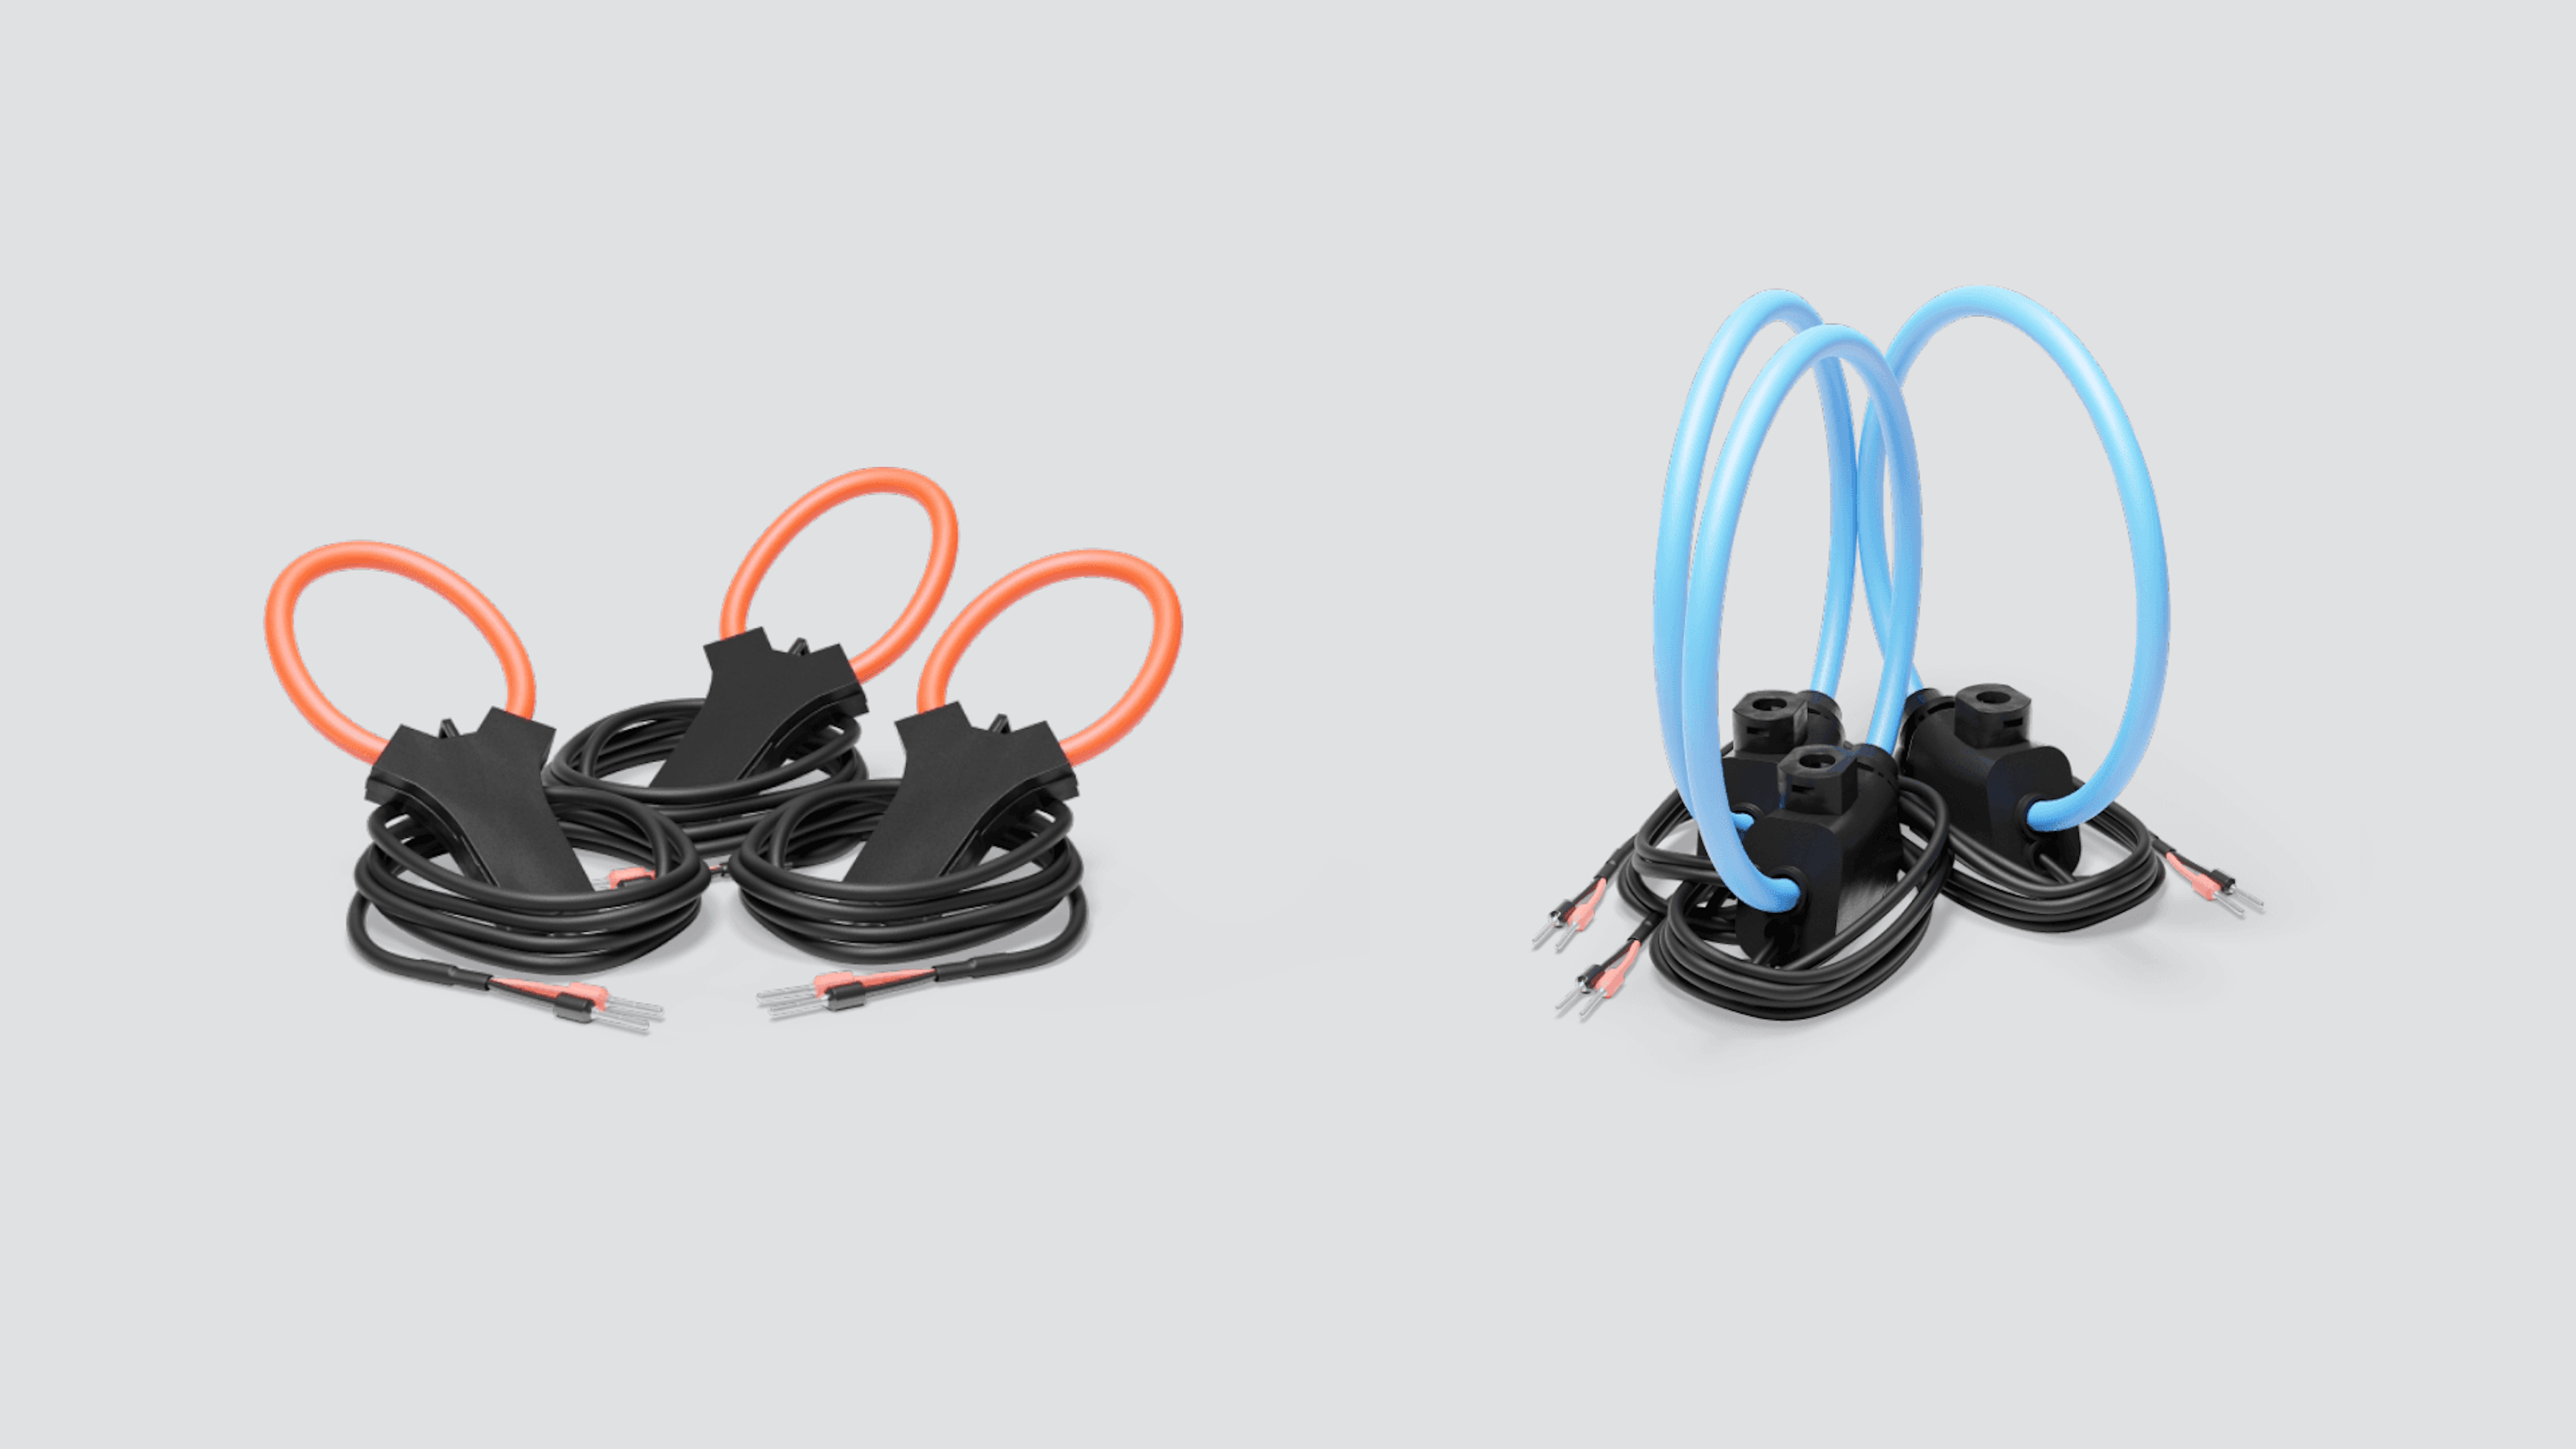
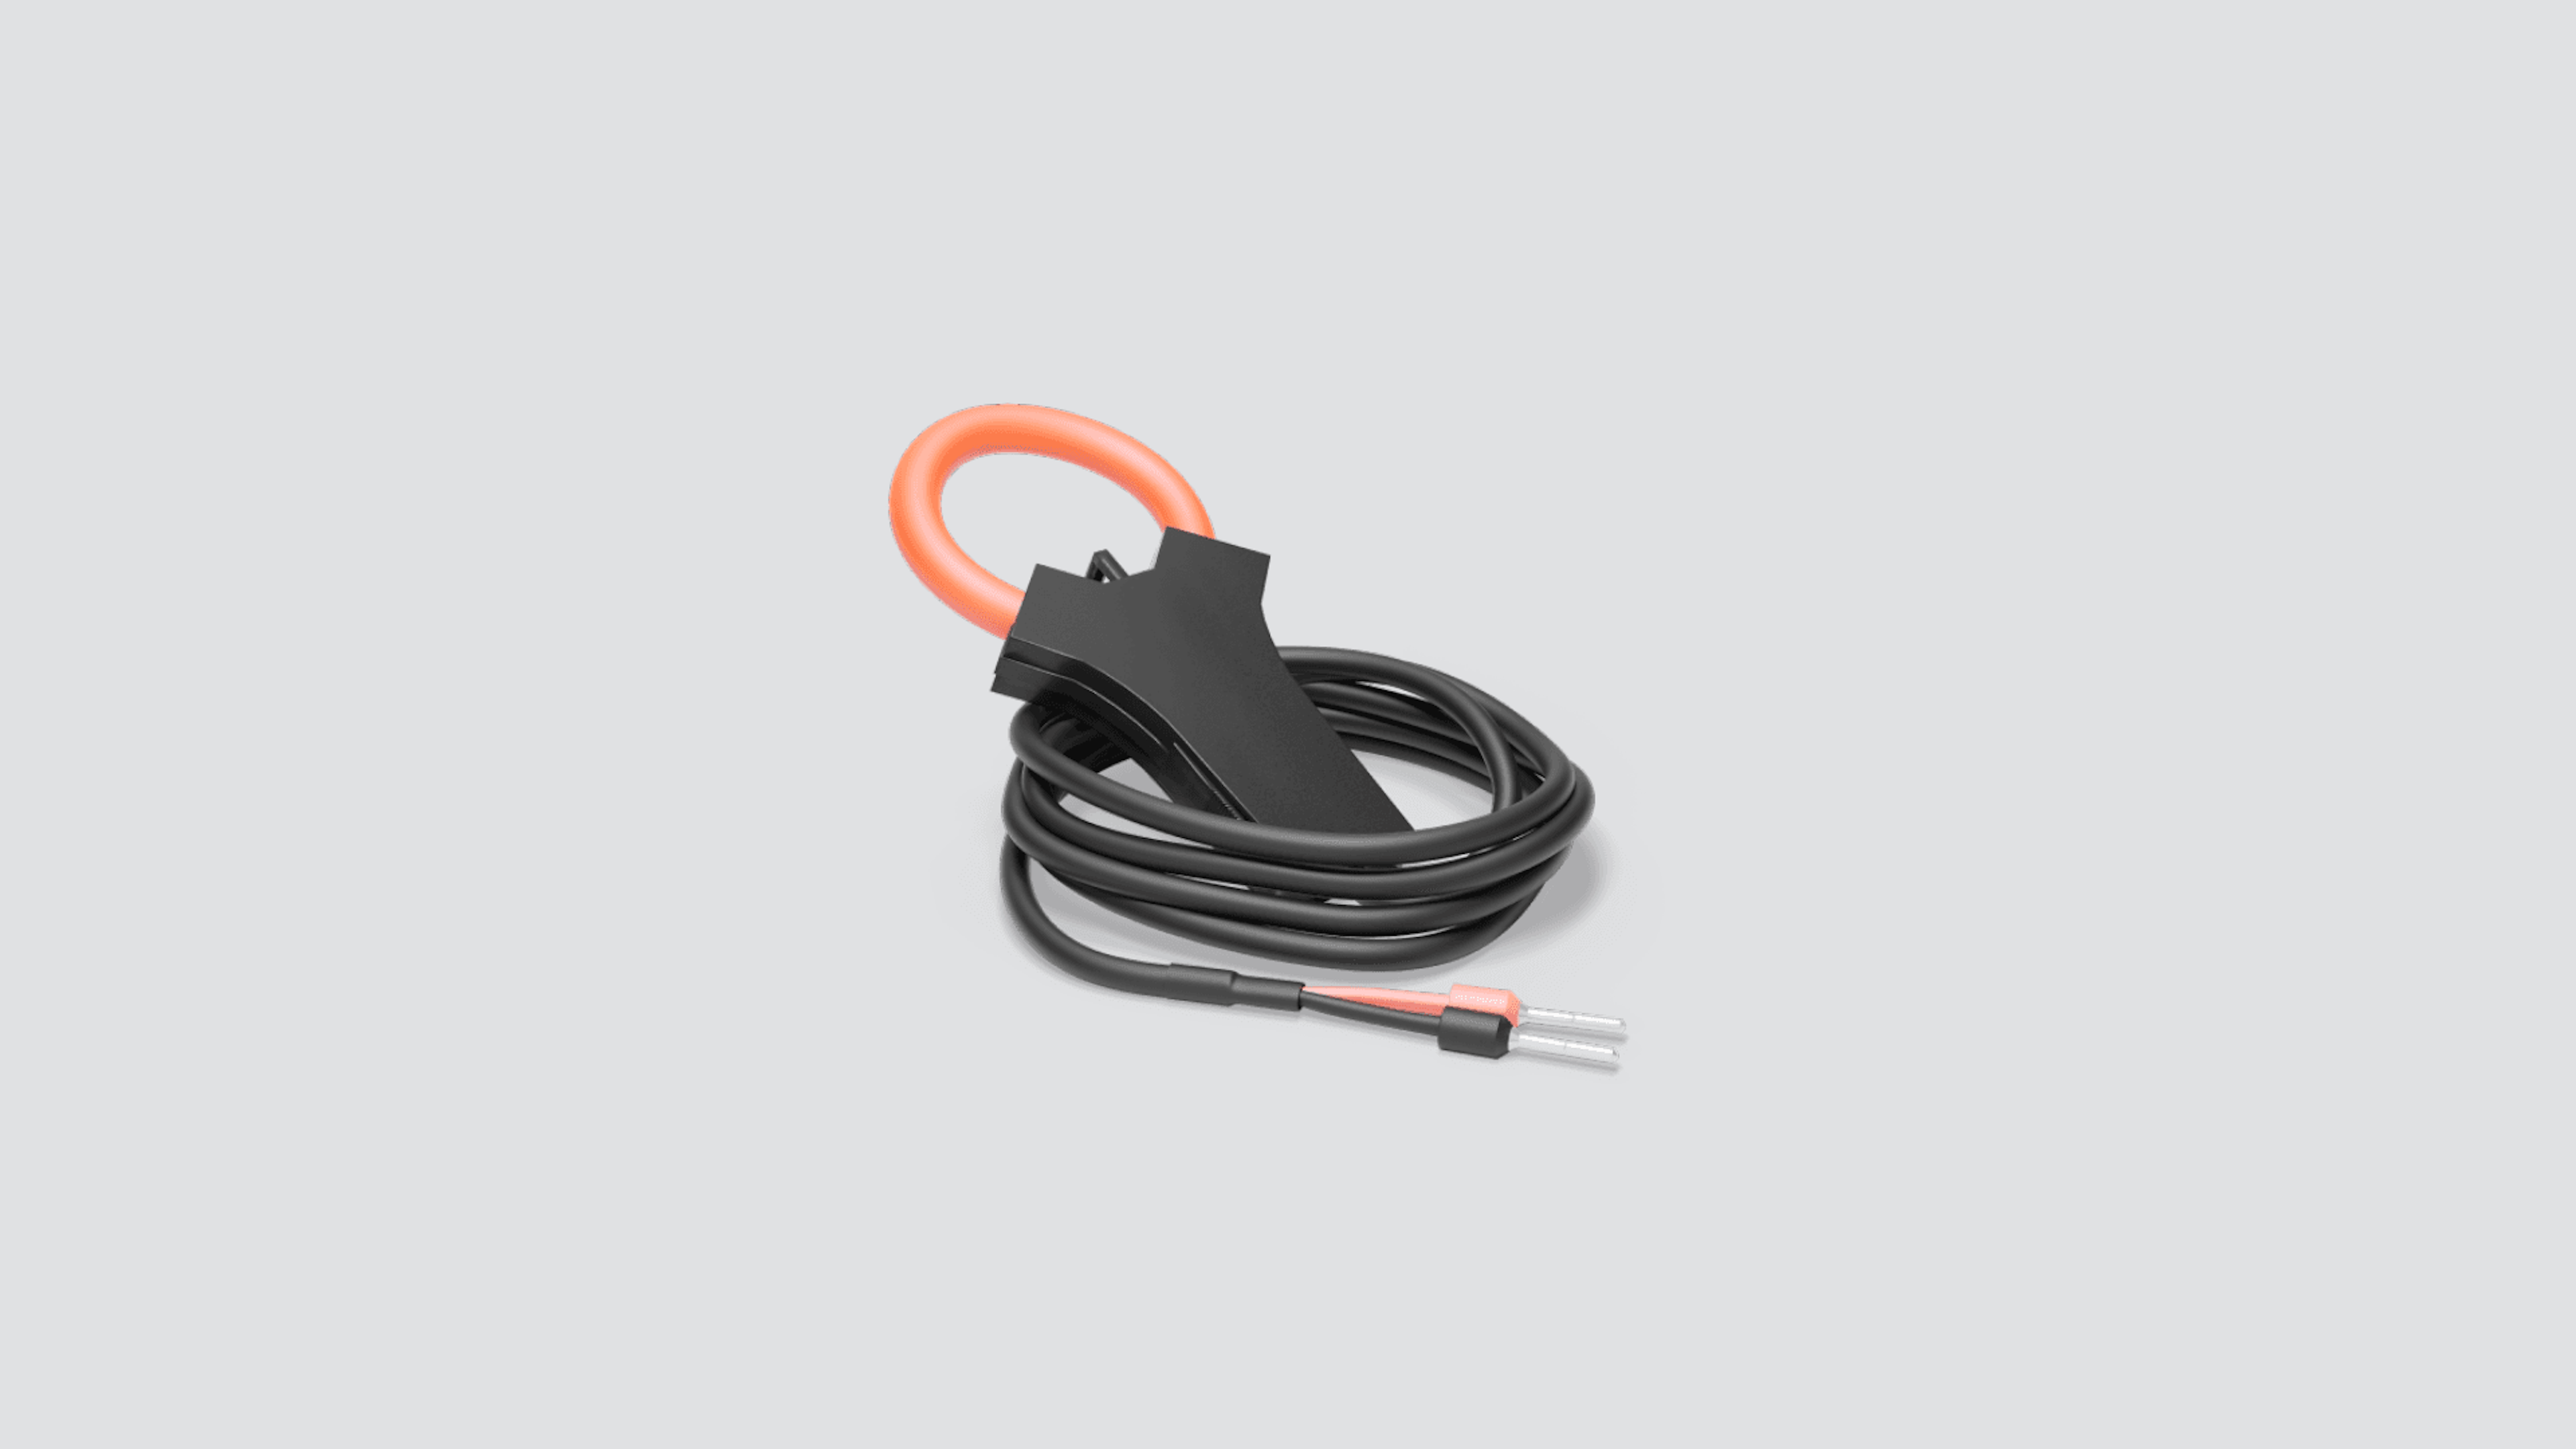
To effectively measure the current in both small and large installations, several alternative current sensors are available. These sensors offer different diameters for the loop, namely 16mm, 36mm, and 100mm. All three sizes are available with a normal current range of 0-900A. The two larger sensors, 36mm and 100mm, also offer a high-current variant with a current range of 0-2.5kA. The high-current variant is purchased separately.
The package includes:
- 1x Energy Monitor Measuring Unit
- 3x Current Sensors, low current 16mm or 36mm
- 1x USB Charger
- 1x Velcro Strap
- 1x Manual
- 1x License
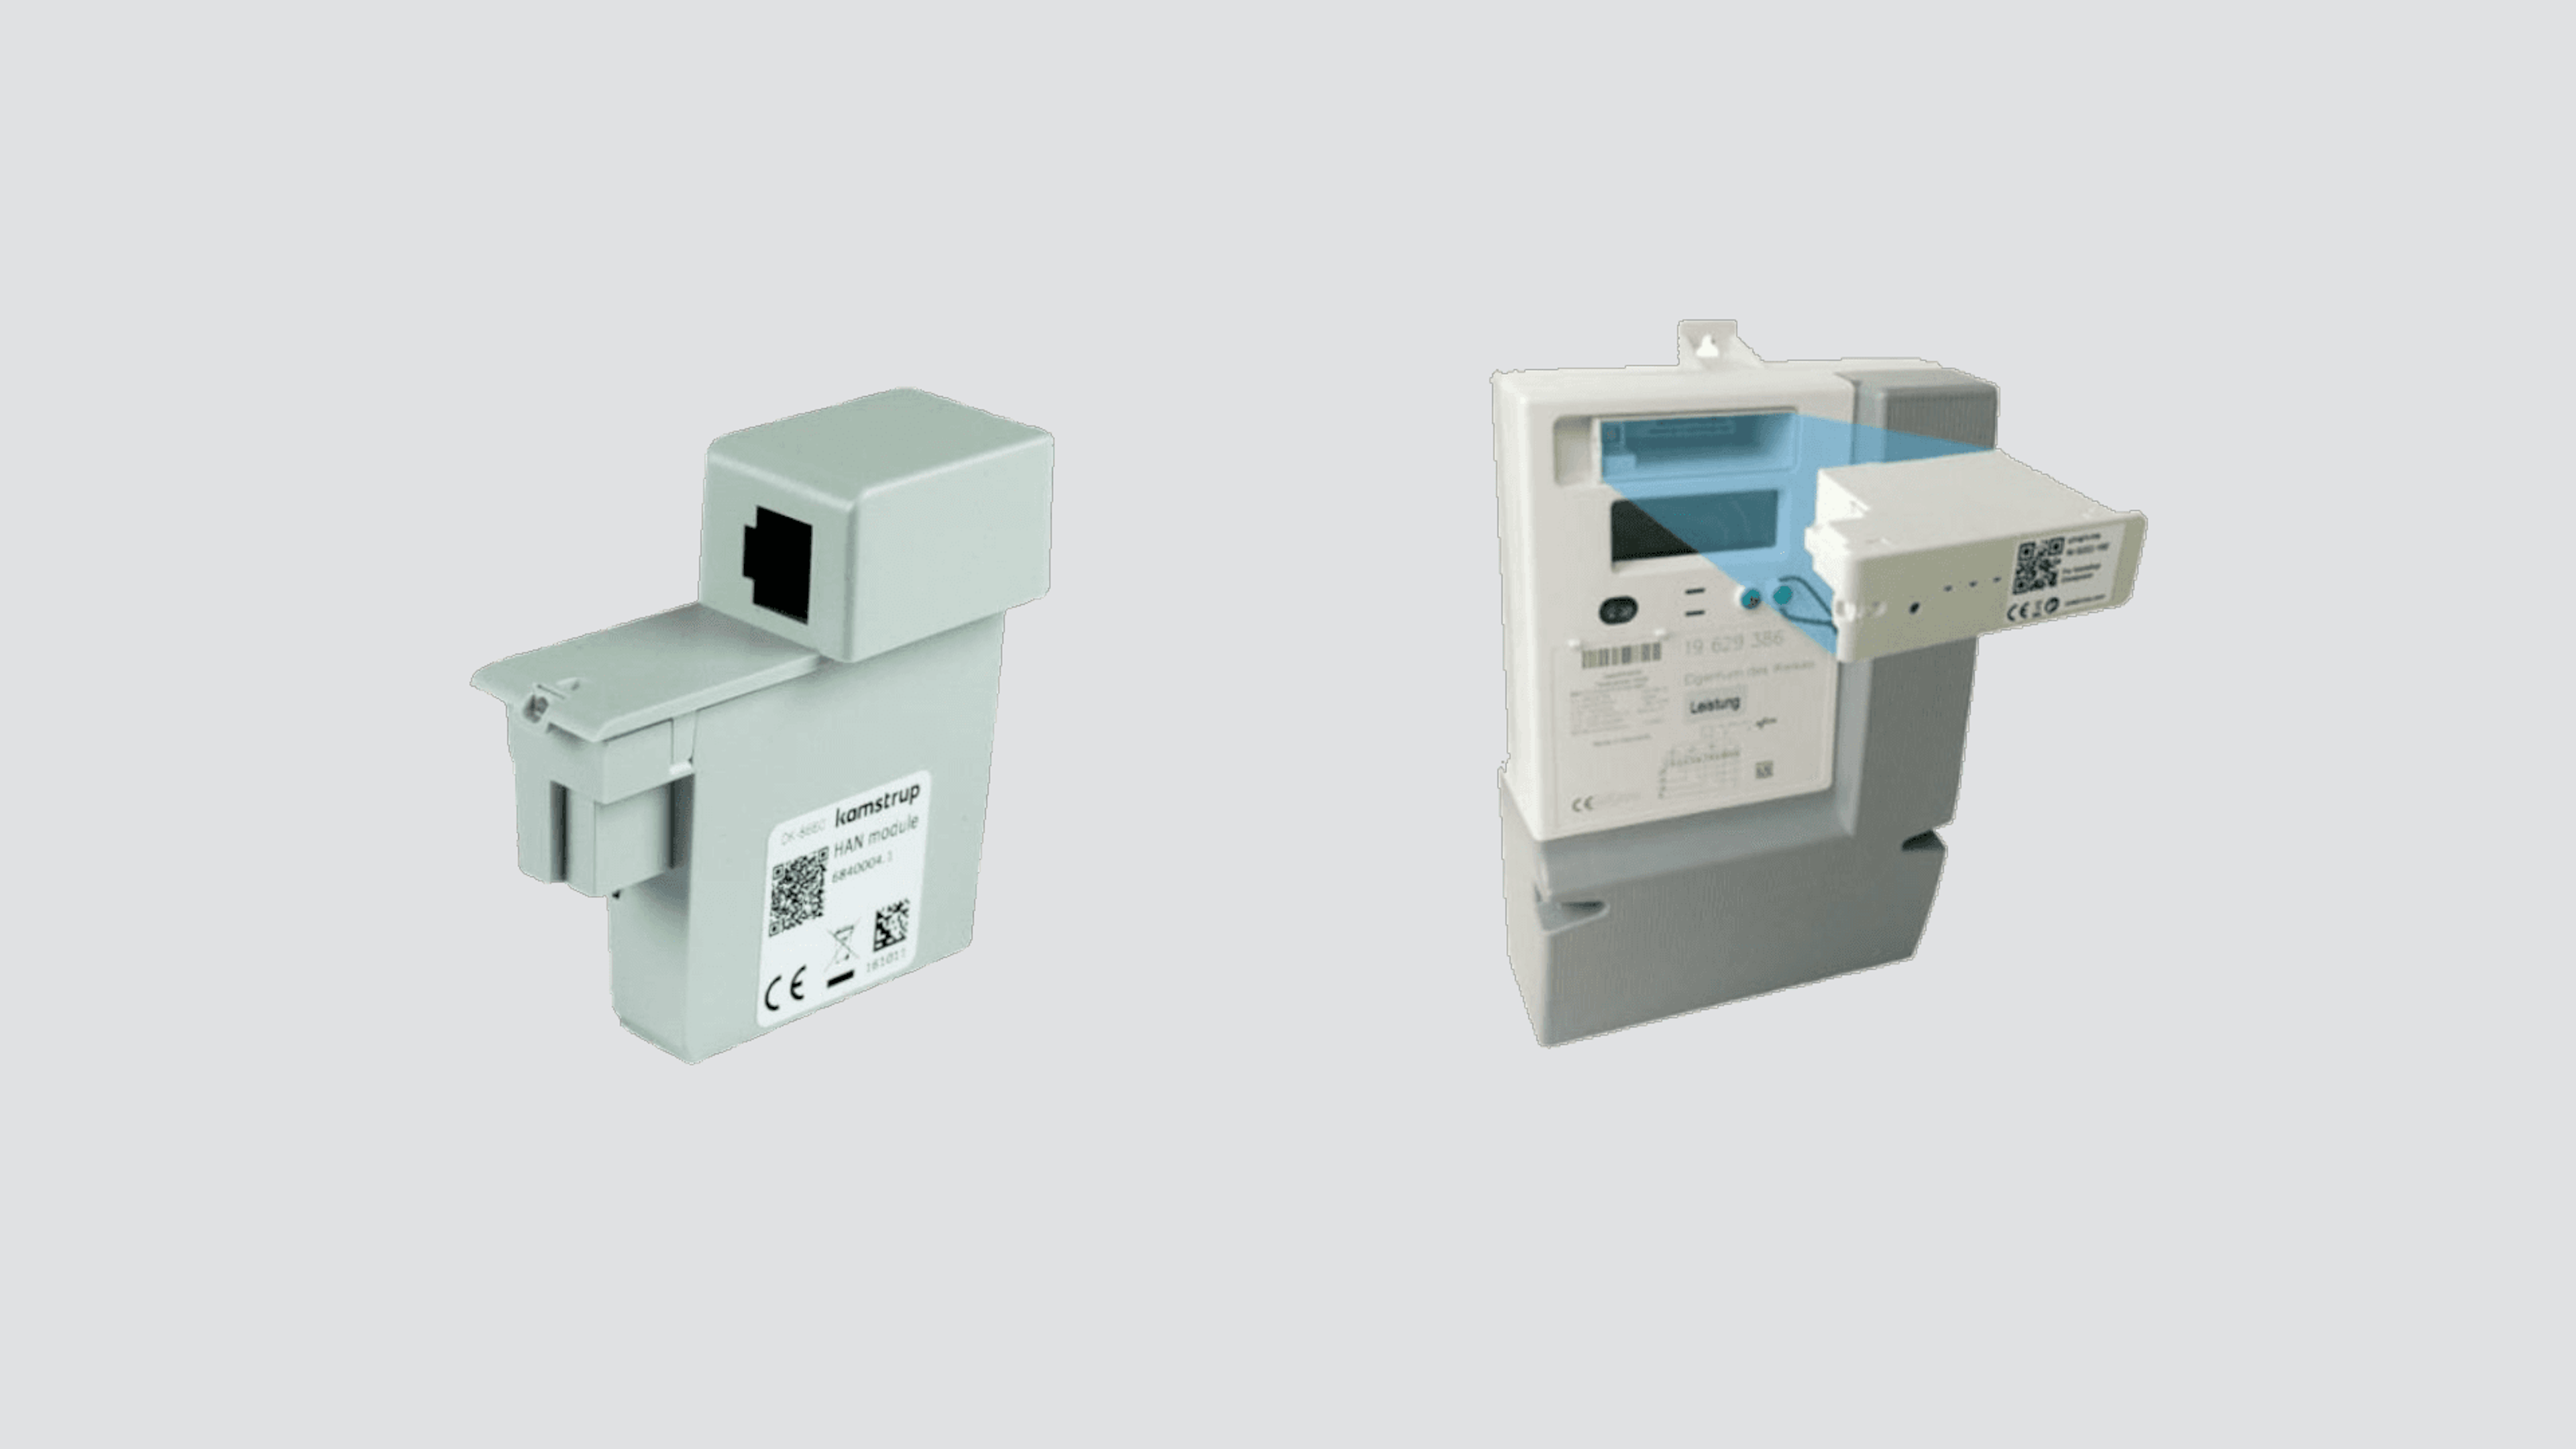
Enegic Monitor One
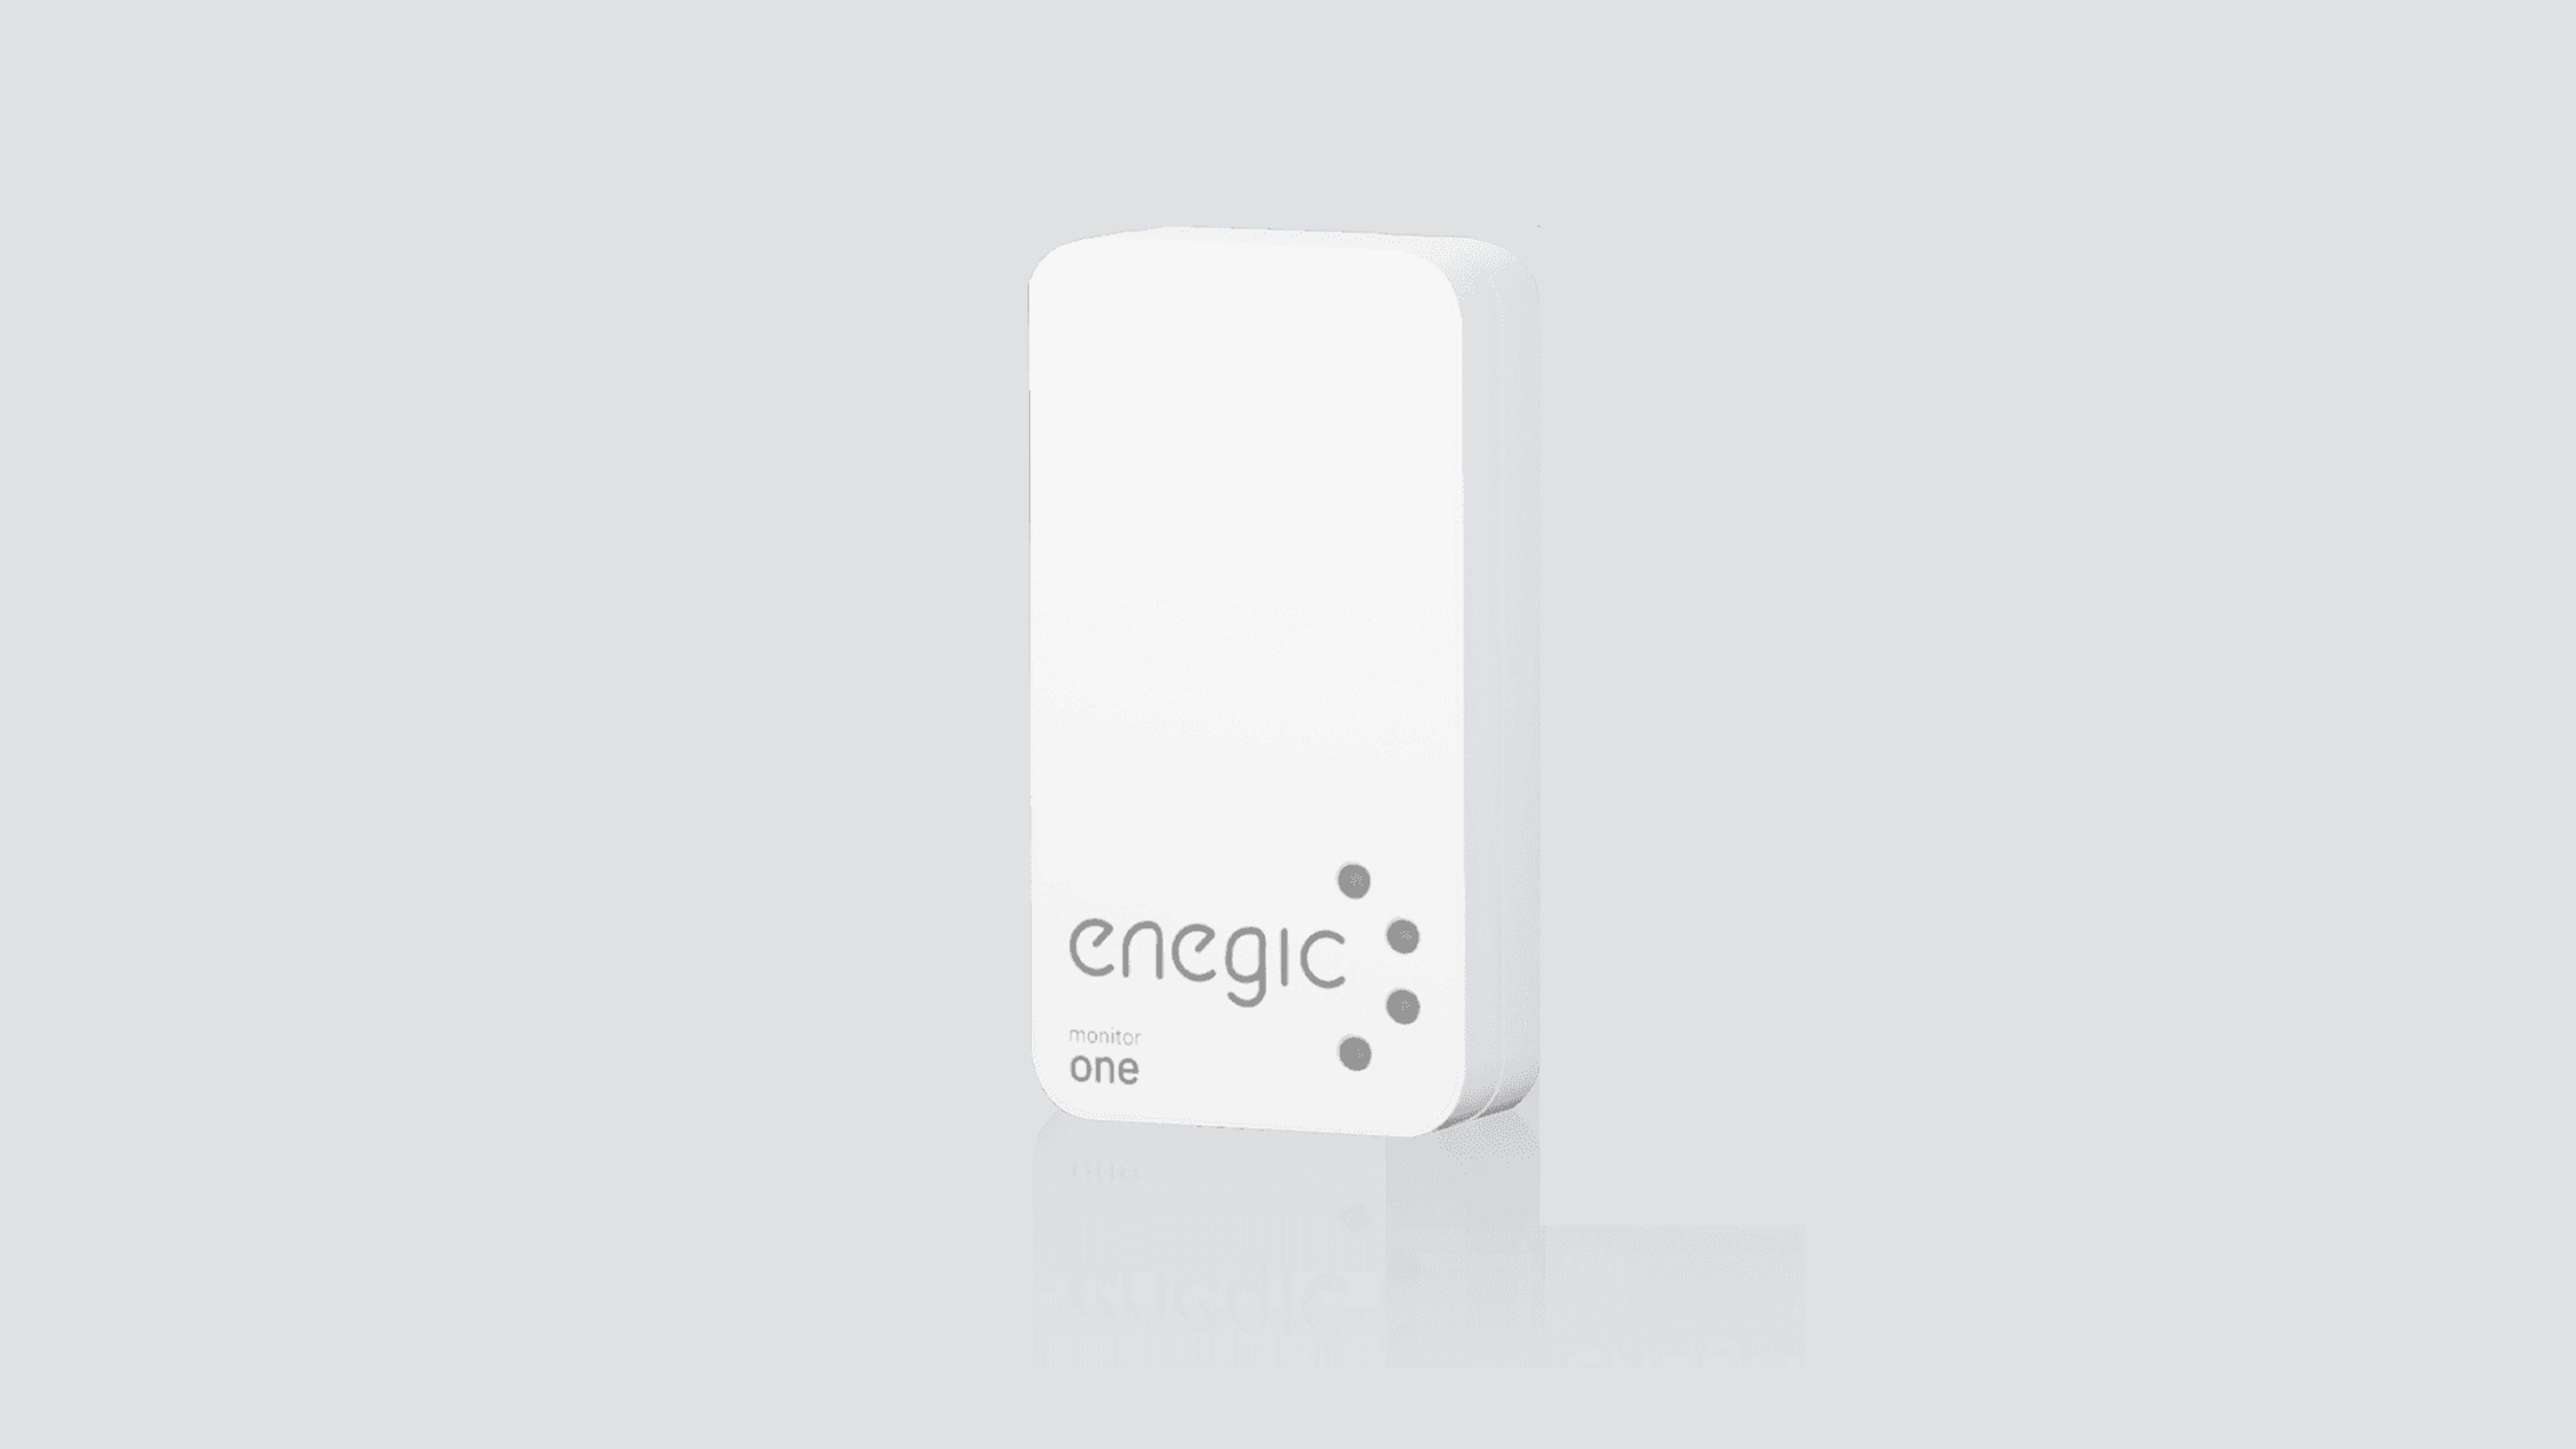
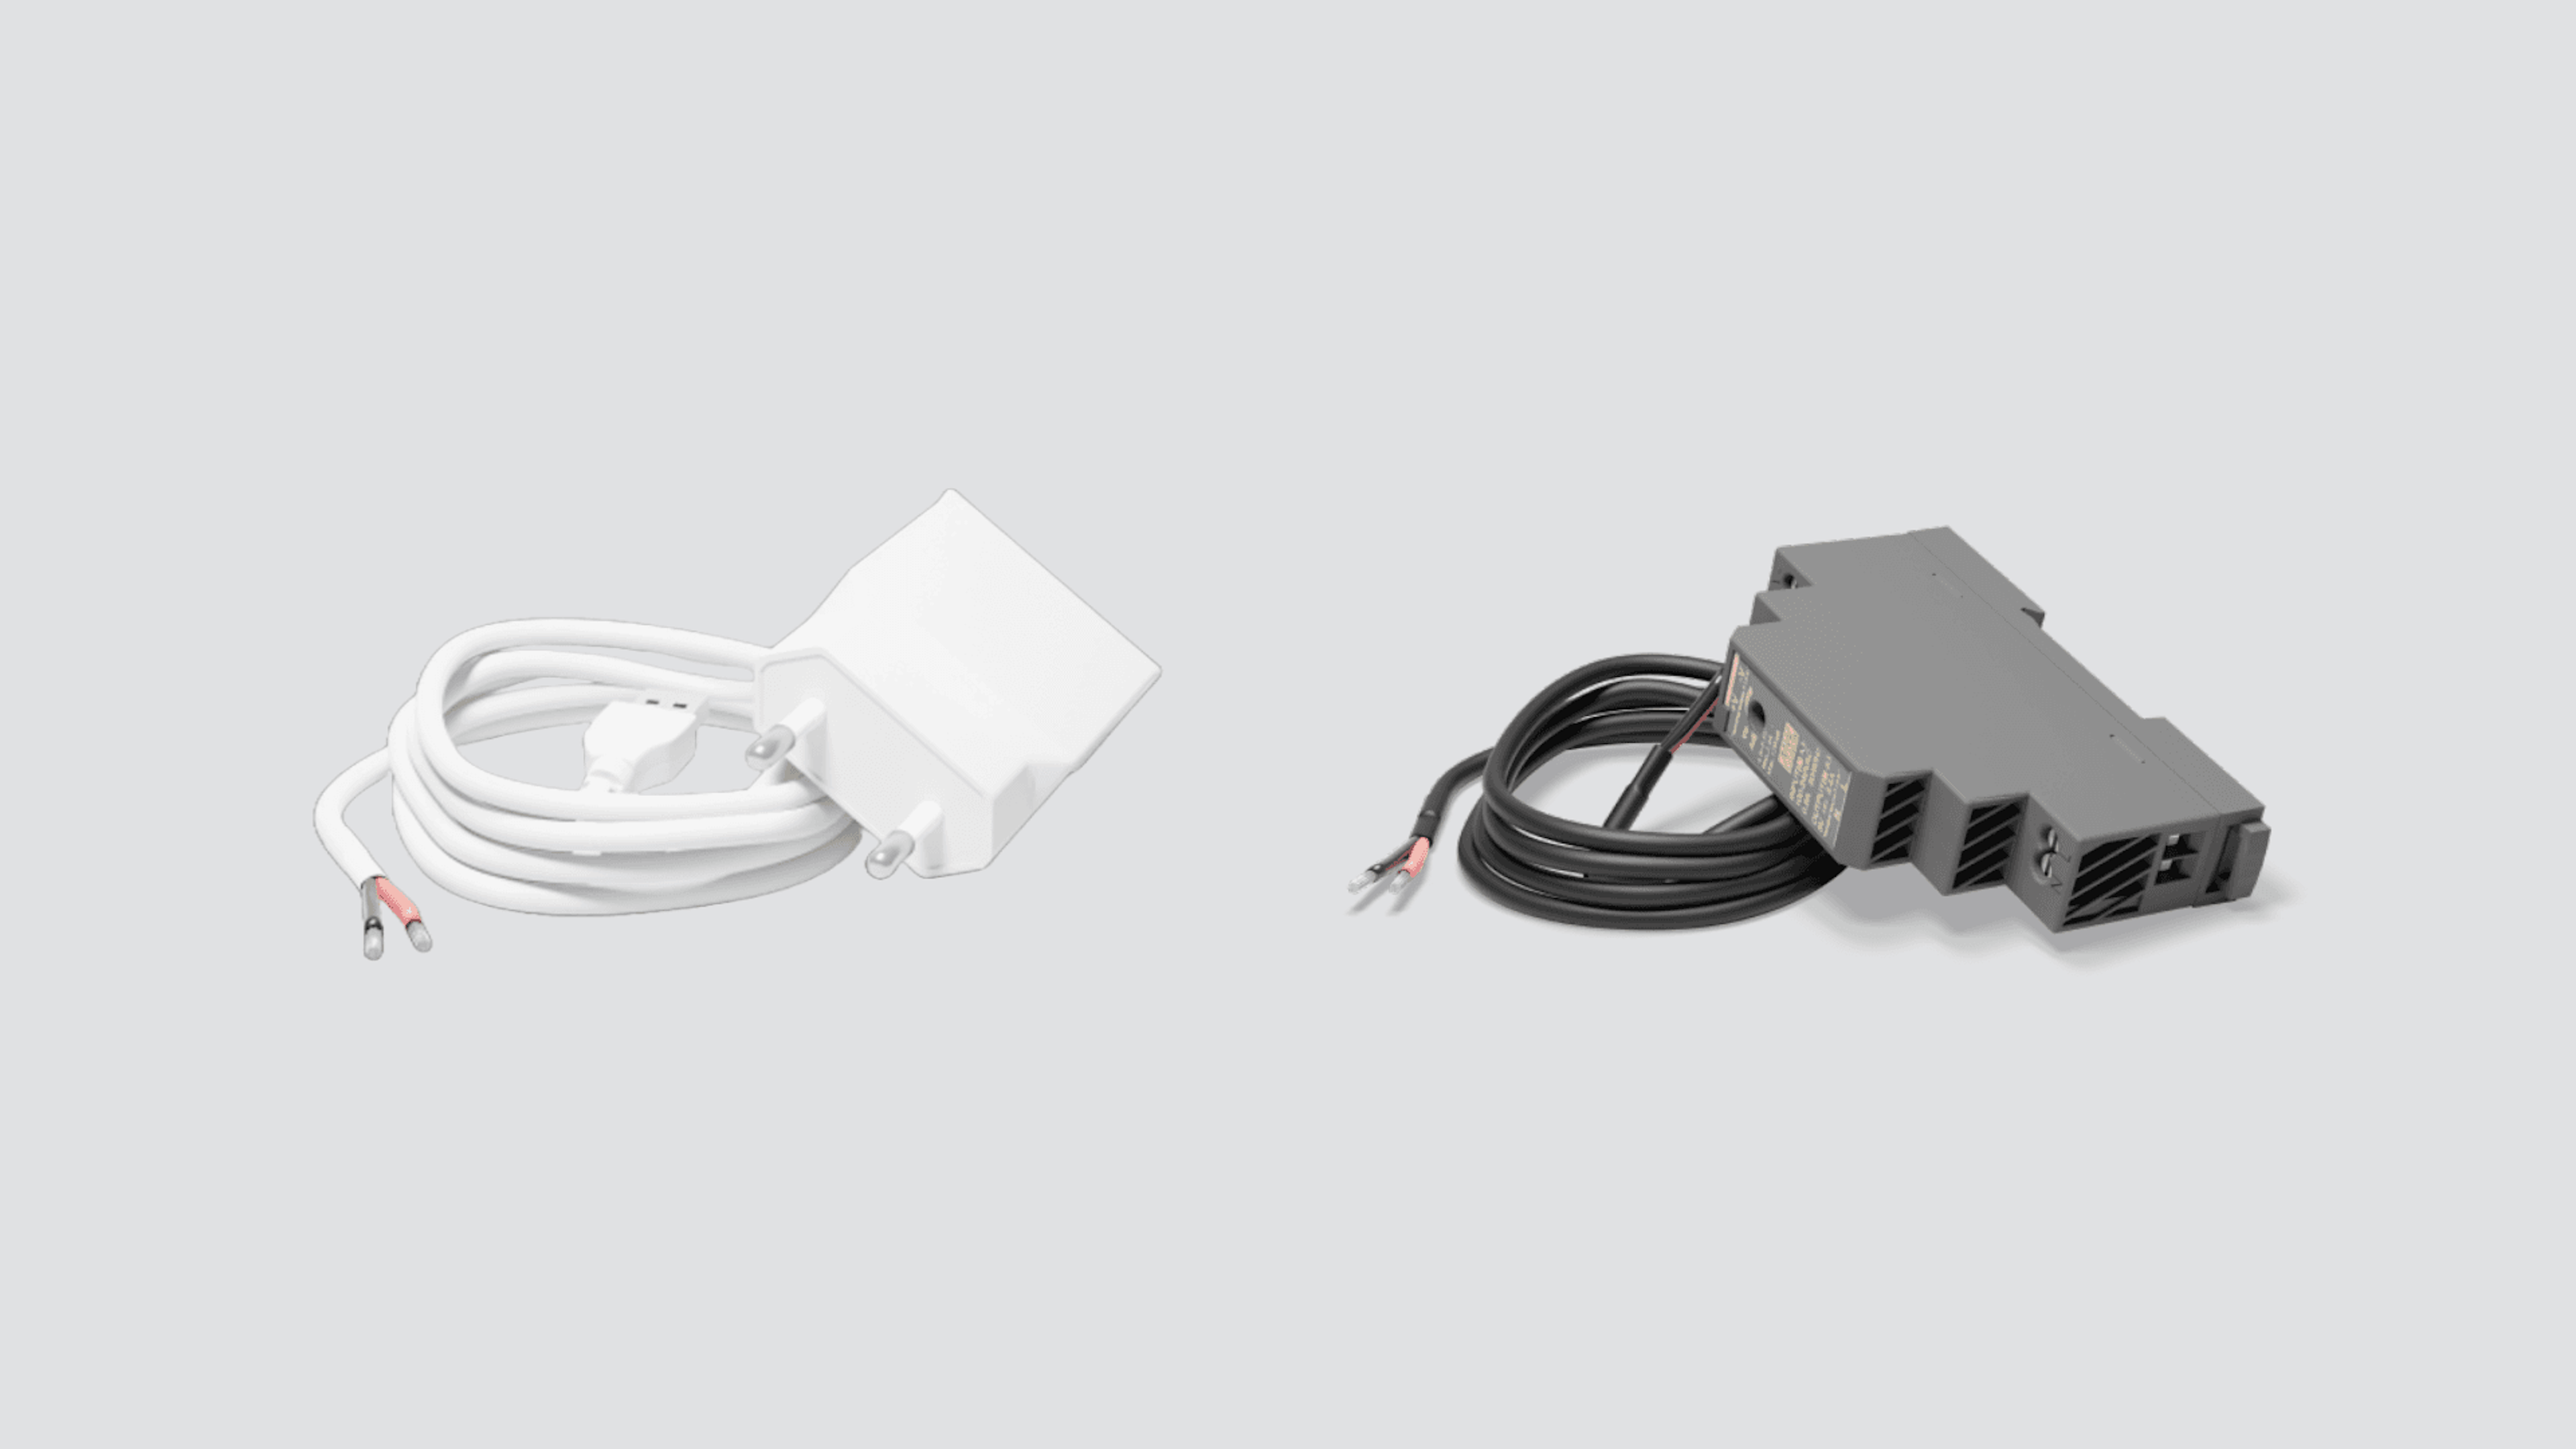
Enegic Monitor One is a variant that simplifies installation by connecting the unit directly to the smart electricity meter's P1 port/RJ12. Note that you cannot install the unit with power transformers. Currently, there is no support for HAN port/RJ45. The unit is powered by most smart electricity meters, but there may be exceptions depending on the brand and model. If the unit does not get enough power, it can be powered via the accessories USB adapter with terminal cord or separate power adapter DIN with terminal cord.
Compatible electricity meters include Aidon 6534, Kamstrup, Landis+Gyr E360, Sagencom T211, Sanxing S34U18, Sagencom T211, Aidon 6534, Sanxin S34U18. For some Kamstrup meters, Kamstrup Omnipower HAN module for P1-RJ12 is required. Note that the module does not pass current, therefore either USB or power adapter is required.
Enegic EVI
Enegic EVI is a new general license that simplifies the installation process for all installers. EVI is available for both Monitor and Monitor One. With this license, all charger box integrations with Enegic are open under one and the same license. As an installer, you can easily choose which charger box you want to configure directly in the app. Although previous licenses for specific charger boxes like Zaptec, Easee, and Charge Amps continue to work, the new general license offers a smoother process, especially in environments with charger boxes from various suppliers.
Installer's Checklist
Compatibility
Always check the compatibility between Enegic and the charger box you are going to install. Ensure that there is an integration between the manufacturers. You can see all current, new, and upcoming integrations here. Currently, there are integrations between charger box manufacturers such as Amina, Easee, Zaptec, Wallbox, Charge Amps, Autel, Nexblue. Also, charger box operators like Monta, Clenergy EV, and payment solutions like Vourity.
Installation Preconditions
Start by assessing which type of Enegic you should install. If the customer has a compatible smart electricity meter, we recommend installing Monitor One. Then you connect the unit via RJ12 connector directly into the electricity meter. If external power supply is required, install the unit with a USB adapter with terminal cord or separate power adapter DIN with terminal cord.
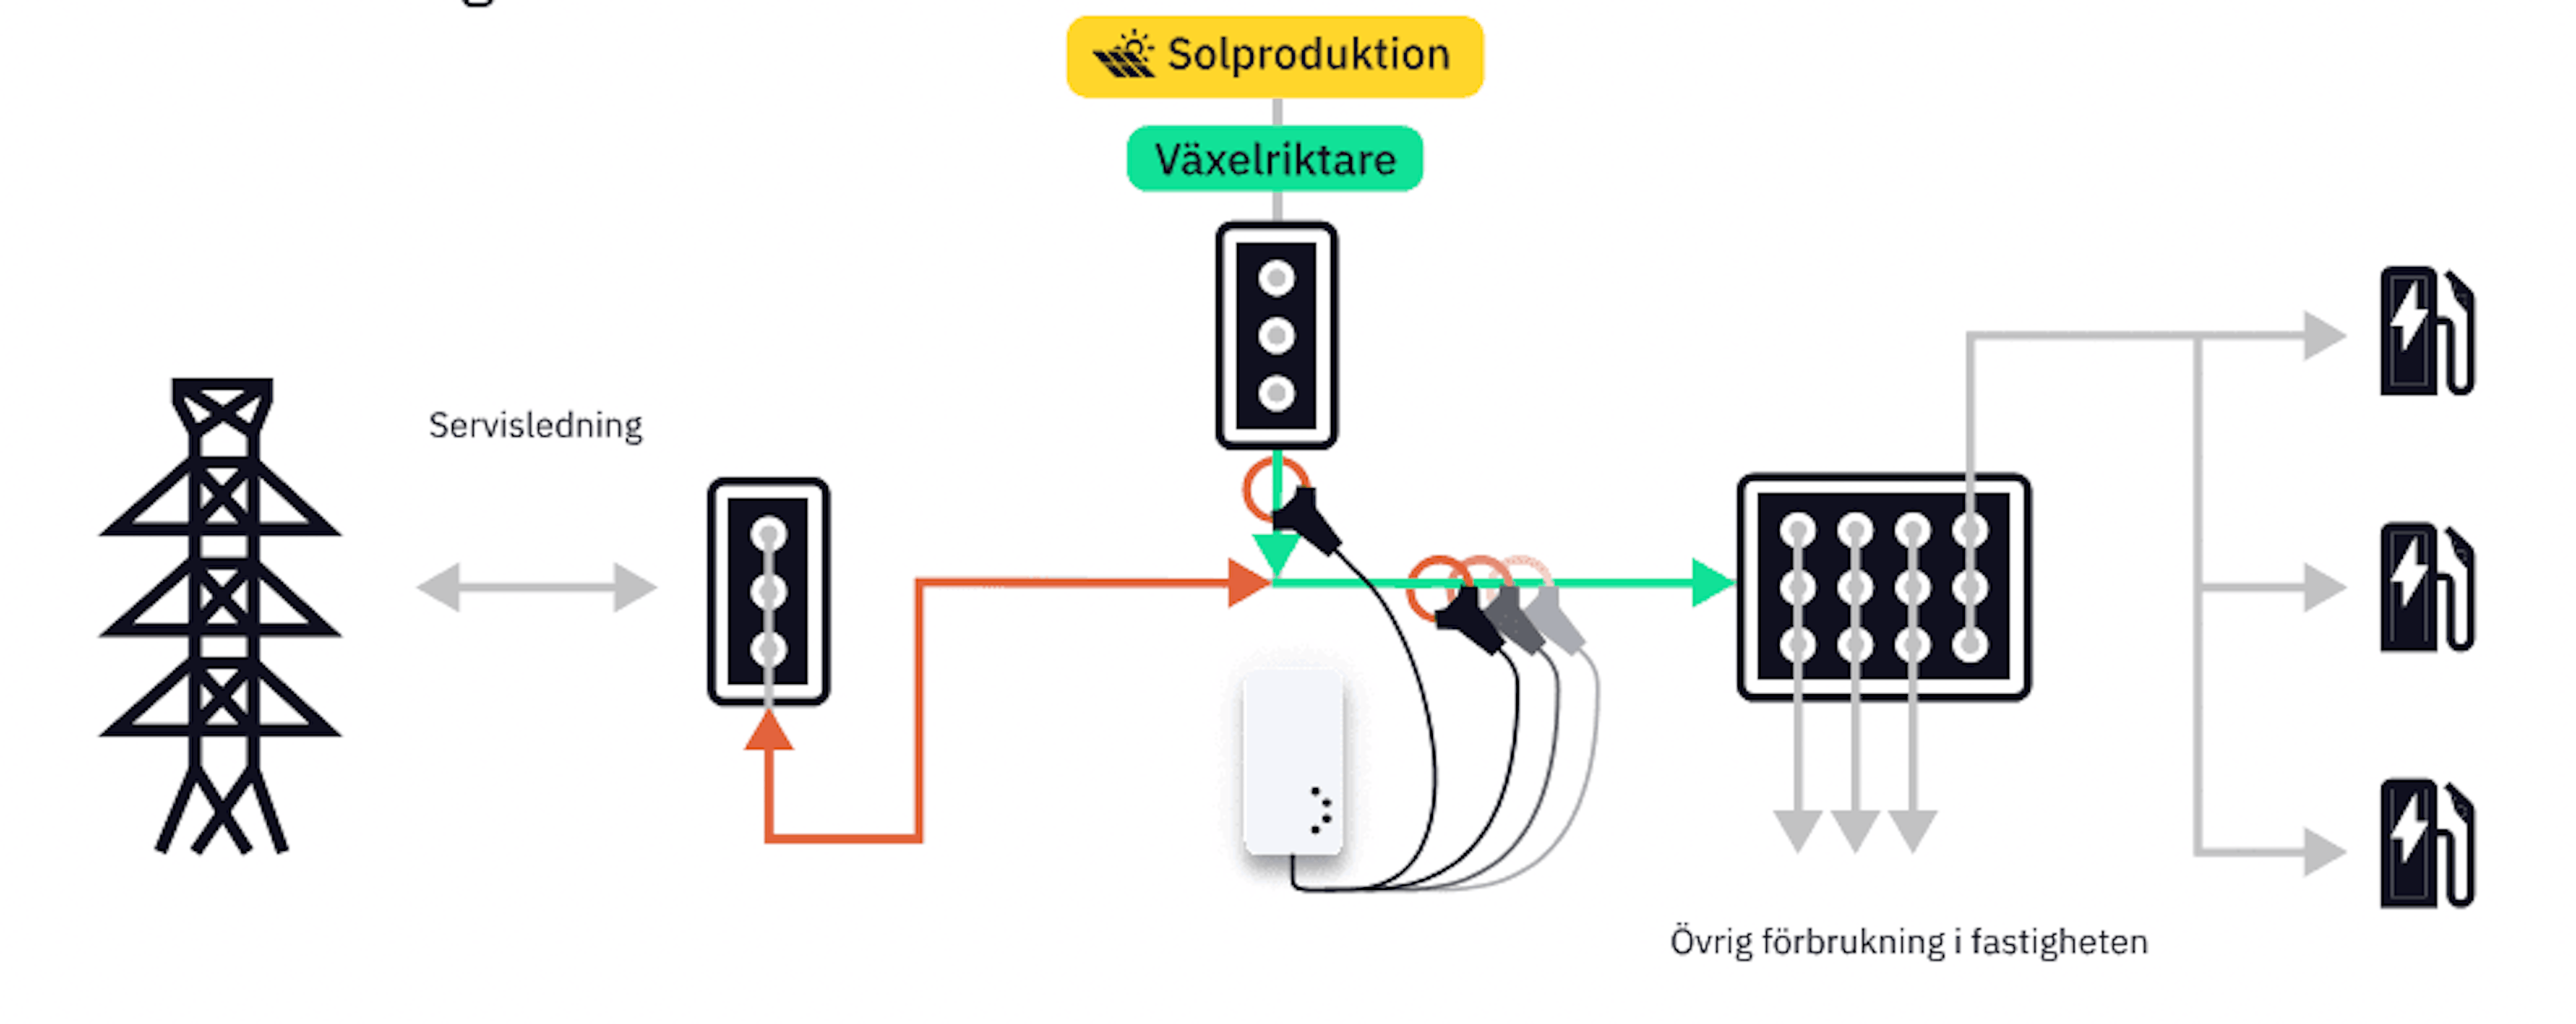
Solar Production Measurement
For properties with their own solar production, Enegic can offer access to detailed information about the property's current production capacity. By connecting a fourth current sensor for solar cell measurement at L4, Enegic Monitor can measure the power generated from the solar cell installation. This gives a clear and distinct picture for the customer of how the energy flow is distributed between production and consumption in the property.
Note that Enegic Monitor does not work correctly in the presence of a battery system in the solar cell installation. Therefore, it is important to avoid such configurations to ensure proper function. For further reading about solar production and principle sketches for installation, you can read more here.
Integration Methods
Understand the difference between Full integration and Light integration. Based on this, you can offer the customer selected features together with the supplier you have chosen.
- Full integration – Enegic can use the API from the charger box, thus offering scheduled charging and control of spot prices. This integration is more advantageous as it enables more features.
- Light integration – Enegic sends current values from measuring units to the charger boxes' cloud for dynamic load balancing. This integration has fewer functional possibilities.
Features
Understand the differences between various features offered to respective charger boxes or operators. If you wish to see which features work with respective charger boxes, you can find them here.
Dynamic Load Balancing – The ability to use as much current as possible for charging without overloading the main fuse.
Offline Mode – If the system or cloud for the charger box goes offline, the charger will revert to a safe charging mode or an offline level.
OptiCharge – Smart charging to charge your car when electricity prices
Solar Measurement – Enegic can measure the power produced by your solar panels. For this function, Current Sensors for solar cell measurement are required, which are mounted in the Enegic monitor (not One).
Solar Charging – A function to charge your car with your own produced electricity from the solar panels. Note that charging occurs when export is 6A or higher (may vary depending on car model).
Multi-Point Measurement – Measure at several points in an installation where you have several electrical cabinets and/or different fuse levels.
Hierarchical Load Balancing – With multi-point measurement, we can ensure that all necessary fuse levels are protected, from the main fuse all the way down to where the chargers are connected. This ensures that all fuses are protected and not just the main fuse.
Installation and Configuration in Three Simple Steps
If you want to get started with Enegic and take advantage of its energy efficiency and convenience, here is a simple guide in three steps:
1. Create Customer Account with Enegic App
Start by creating or logging in to your installer account and create an account for your customer. This step is fundamental to connecting Enegic to the customer's facility. By following this step, you ensure that your customer has access to the features and benefits that Enegic offers.
2. Install and Configure Enegic at the Customer's Property.
After the customer account has been created, it is time to install and configure Enegic at the customer's facility. The installation does not require you to disconnect anything in the facility. You can easily mount the sensors around the incoming phase conductors to measure the current without having to make any complicated interventions in the system. With Monitor One, you connect the meter to the P1-RJ12 port. This makes the installation smooth and convenient for users.
Unit Installation
You can view the entire installation video here or follow the steps below.
- Connect the current sensors around the phase conductors: a. Identify the phase conductors (normally L1 brown, L2 black, and L3 gray). b. Attach the current sensors around the phase conductors and tighten them securely. c. Ensure that all sensors are correctly connected so that the entire property's consumption is measured.
- Pull the cables from the sensors out of the electrical cabinet.
- Connect the current sensors to the measuring unit: a. Open the measuring unit and connect the current sensors to the terminal block. b. Connect L1 to 1, L2 to L2, and L3 to 3 (L4 at 4 if used for solar measurement). c. Connect red cables to "+" and black cables to "-".
- Power the unit with a DIN or USB adapter.
- Secure the cables with cable ties and remount the cover on the unit.
- Attach the unit outside the electrical cabinet with the included Velcro strap.
- Power the unit with a power adapter via DIN or USB adapter.
- Close the electrical cabinet.
- When the unit starts flashing blue, it is ready to be configured.
Charger Box Configuration
The configuration may look different depending on the brand. In this example, we use Charge Amps. Click here to see the configuration for different brands.
- Ensure a Monitor is installed and configured for total consumption.
- Commission the Charge Amps charger box and connect it to a user account at Charge Amps.
- In the Enegic app, go to 'Settings' and 'Licenses', scan the QR code on the integration license.
- Go to 'Settings', 'Reporters' and add Charge Amps as a reporter.
- Enter a suitable name for the reporter and generate a serial number and PIN.
- Enter the generated serial number and PIN in Charge Amps Partner.
- Specify the size of the main fuse.
- Check that the correct Enegic Monitor unit is specified as the measuring unit for total consumption. Press Save.
To do in Charge Amps partner page
- Create a new Measurement Device under the current user with the generated serial number and PIN from the reporter.
- Create a new Load Balancer and connect it to the current user. Add Measurement Device and charger box.
- When all settings are done, the Measurement Device will appear with the status ACTIVE, indicating that the Charge Amps system has begun receiving data from the Enegic reporter.
Now Enegic Monitor is integrated with Charge Amps.
3. Give the Customer Information
Finally, when Enegic is successfully installed and configured, it is important to inform the customer that an account has been created in their name. You should also hand over the username to the customer so that they can easily log in and start using the Enegic app to monitor and manage their energy consumption. This gives the customer control over their facility and enables them to take advantage of the benefits of Enegic.
By following these three steps, you can ensure a smooth installation and configuration of Enegic for your customers. This will not only improve their energy efficiency but also increase their convenience and control over their facility.
FAQ - Frequently Asked Questions
Which Charger Boxes are Compatible with Enegic?
You can see all current, new, and upcoming integrations here. Currently, there are integrations between charger box manufacturers such as Amina, Easee, Zaptec, Wallbox, Charge Amps, Autel, Nexblue. Also, charger box operators like Monta, Clenergy EV, and payment solutions like Vourity.
How Does Enegic Handle Power Outages?
The system automatically shifts to a safe charging mode during power outages.
Can Enegic Be Used with Solar Panels?
Yes, Enegic has features for both solar measurement and solar energy charging.
What are the Advantages of Hierarchical Load Balancing?
It protects all fuse levels in the installation, not just the main fuse.
How is the System Updated?
Updates occur automatically via the cloud, keeping the system always up-to-date.